Rice Rose Water Anti-Aging Cream: Japanese DIY For Zero Wrinkles & Glass Skin
Rice beauty rituals trace back to historic Japanese practices where starchy rice rinses were prized for a smooth, luminous complexion—what we now call “glass skin.” Rice starch can help calm and cushion the skin, while rose water soothes redness and adds a delicate, refreshing feel. When you blend these with hydrating aloe, moisture-locking glycerin, and antioxidant vitamin E, you get a gentle, plush gel-cream that leaves skin bouncy, dewy, and evenly toned—without harsh actives.
Ingredients Required
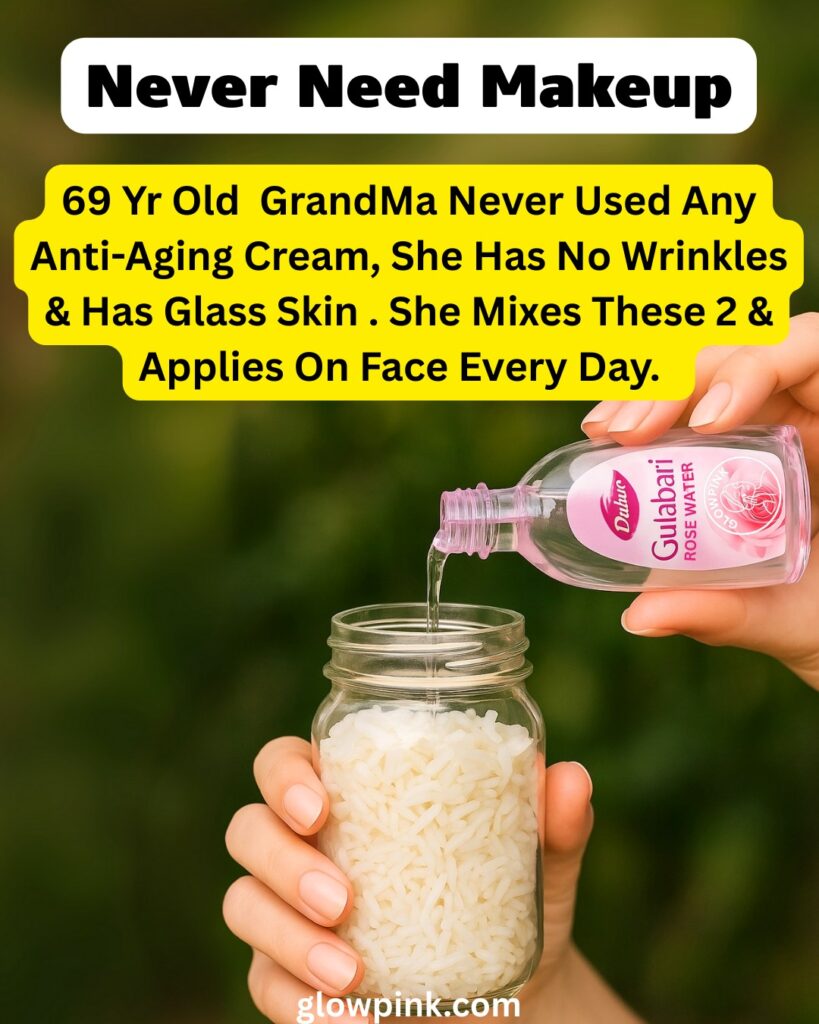
Cooked white rice – 3 tbsp (for a soft, starchy gel base).
Rose water – 2 tbsp (soothing, refreshing botanical water).
Pure aloe vera gel – 2 tbsp (lightweight hydration and calming).
Vegetable glycerin – 1 tsp (a humectant that draws in moisture).
Vitamin E oil (tocopherol) – 6–8 drops (antioxidant support).
Optional for a richer cream: ½–1 tsp sweet almond oil + ¼ tsp beeswax for better emulsion stability.
Clean jar, whisk, blender, fine strainer/muslin, and a small ice-bath bowl for quick cooling.
Procedure (two easy paths)
A) Quick Gel-Cream (5–10 minutes; fridge-kept)
Make rice gel: Blend 3 tbsp warm cooked rice with 3–4 tbsp hot water until silky. Strain through muslin to get a smooth, semi-thick rice gel.

Base mix: In a bowl, whisk 2 tbsp rose water + 2 tbsp aloe gel until uniform.
Hydrators & antioxidants: Whisk in 1 tsp glycerin and 6–8 drops vitamin E.
Combine: Gradually whisk in 2–3 tbsp rice gel until you get a glossy gel-cream.
Optional richness: Drizzle in ½ tsp carrier oil, whisking briskly. (If it separates slightly after chilling, just shake before use.)
Cool & jar: Set the bowl over an ice bath for 1–2 minutes to thicken, then transfer to a sterile jar and refrigerate.

B) More Stable Cream (10–15 minutes)
In a heat-safe cup, gently melt ¼ tsp beeswax with ½–1 tsp sweet almond oil (double boiler).
In a separate cup, warm rose water + aloe just to lukewarm.
Emulsify: Slowly pour the warm oil phase into the warm water phase while blending; then blend in glycerin, vitamin E, and 2–3 tbsp rice gel. You’ll get a soft cream that holds together better.
Cool over an ice bath, then jar and refrigerate.
Instructions (how to use)
Patch test first: Apply a pea-size amount to the inner forearm or behind the ear for 24 hours.
When: Use on clean, slightly damp skin AM/PM.
How: Massage a chickpea-size amount over face and neck. In the morning, follow with sunscreen.
Storage: Keep refrigerated; use within 7–10 days for the quick version or 2–3 weeks for the beeswax-stabilized cream. Discard if scent, color, or texture changes.
Glass-skin tip: Layer over a hydrating mist/toner, and seal with a drop of oil on very dry spots at night.
Benefits of This DIY
Soft, cushioned finish from rice starch: Helps skin feel smoother and look more even, contributing to that “glass” reflection.
Redness-soothing comfort from rose water: Calms and refreshes, leaving the skin cool and balanced.
Deep hydration with glycerin: Draws moisture into the outer skin layers for a plump, line-diffusing look.
Bounce and calm from aloe: Lightweight gel texture comforts the skin and supports a supple feel.
Antioxidant support with vitamin E: Helps protect skin lipids, promoting a more even-toned glow.
Safety & Customization
Sensitive or acne-prone: Start with the gel-cream (oil-free) and skip the carrier oil.
Very dry skin: Use the beeswax version and add 1–2 drops of carrier oil at application.
Fragrance concerns: Choose unscented rose water or dilute with distilled water.
Allergies: Avoid if you’re reactive to roses, aloe, or nuts (almond oil). Always patch test.
This balanced, low-cost formula blends timeless rice rituals with modern, skin-friendly hydrators to deliver calm, hydrated, luminous skin—your easy path to a healthy, glass-skin glow at home.
