Dealing with dry, frizzy hair that lacks that natural bounce and shine can be incredibly frustrating, especially after trying countless store-bought serums and oils that seem to fall short. The harsh chemicals and heavy silicones in many commercial products often lead to buildup on your scalp or leave your strands feeling weighed down rather than nourished. That’s why creating your own aloe vera oil has become such a go-to choice for those wanting a fresher, more natural approach to daily hair care.
What if I told you this process is simpler than it looks, using just a couple of everyday ingredients? Stick around, because I’ll not only share the exact steps but also a clever customization tip that can make your homemade batch even more suited to your specific hair needs.
Why Aloe Vera Oil Is a Favorite in Natural Hair Care
Aloe vera has been cherished for centuries in beauty traditions around the world for its soothing gel. When combined with a carrier oil, it creates a lightweight, hydrating mixture that many people love incorporating into their routines. The plant is packed with vitamins, enzymes, and amino acids that contribute to its reputation for supporting soft, manageable hair.
But that’s not all. Many enthusiasts report that regular use of aloe vera-based oils helps their hair appear healthier and more lustrous. While individual results vary, this DIY option gives you full control over the ingredients.
What Is Aloe Vera Oil Exactly?
Simply put, aloe vera oil is typically an infused oil where fresh aloe vera gel is gently simmered with a base oil like coconut or olive oil. The process allows the beneficial compounds from the aloe to transfer into the oil, resulting in a versatile hair elixir.
Unlike pure aloe gel which is water-based and can spoil quickly, the oil version has a longer shelf life and is easier to apply to hair.
Here’s where it gets interesting: the green tint you often see in homemade versions comes from the natural pigments in fresh aloe leaves.
Ingredients You’ll Need for Your DIY Aloe Vera Oil
Gathering quality ingredients is the first step to success. Here’s what you’ll need for a basic batch:
- 1-2 large fresh aloe vera leaves (look for plump ones from a healthy plant or reliable source)
- 2 cups of carrier oil (coconut oil for its solid form at room temp or olive oil for a lighter feel)
- Optional add-ins: A few drops of vitamin E oil for extra preservation or a couple drops of your favorite essential oil for scent (like lavender for calm)
Pro tip: Always use fresh aloe vera rather than store-bought gel when possible for maximum freshness.

Step-by-Step: How to Make Aloe Vera Oil at Home
Ready to get started? This process takes about 30-45 minutes of active time, plus cooling. Follow these steps carefully for the best results.
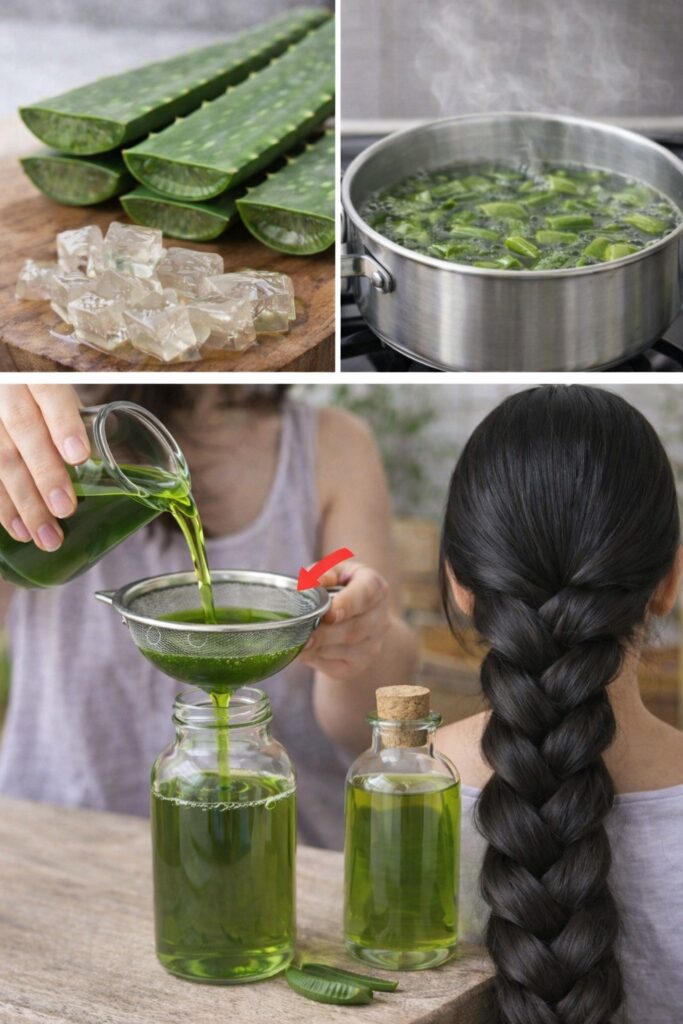
Step 1: Prepare the Aloe Vera Leaves
Start by cutting off a large leaf from your aloe plant using clean scissors. Rinse it thoroughly under running water to remove any dirt. Pat dry with a clean towel.
Carefully slice away the sharp edges on both sides of the leaf. Then, using a sharp knife, cut the leaf into small chunks or scoop out the clear gel if you prefer. The image of those translucent gel cubes shows exactly what you’re aiming for here. Chop them into smaller pieces to increase surface area for better infusion.
Step 2: Heat Your Carrier Oil
Pour your 2 cups of carrier oil into a heavy-bottomed pan or double boiler setup. Warm it over very low heat – you want it warm but not smoking or boiling vigorously. This gentle heat helps extract the properties without damaging the delicate compounds.
Step 3: Infuse the Aloe Vera
Add the chopped aloe vera pieces or gel to the warm oil. Stir gently with a wooden spoon to combine. Allow the mixture to simmer on low heat for 15 to 25 minutes. You’ll notice some sizzling as the water content from the aloe evaporates – that’s normal and part of the process.
Keep an eye on it and stir occasionally. The oil may take on a subtle green hue as the aloe infuses.
Step 4: Cool and Strain
Remove the pan from heat and let the mixture cool completely. This is important for safety and to preserve quality.
Once cooled, pour the mixture through a fine mesh strainer or cheesecloth into a clean glass jar or bottle. Press gently on the aloe solids to extract as much oil as possible. Discard the leftover plant material.
The straining step is key – it gives you that smooth, usable oil you see in those pretty final bottles.
Step 5: Store Your Homemade Oil
Transfer to a dark glass bottle if possible to protect from light. Label with the date. Store in a cool, dark place like a cabinet.

Now here’s the fun part: Your oil is ready to use right away, but letting it sit for a day or two can allow the infusion to deepen.
Tips to Get the Most Out of Your Aloe Vera Oil
Making the oil is one thing, but using it effectively is where the magic happens. Here are some actionable tips:
- Patch test first: Apply a small amount to your inner arm to check for any sensitivity before full use.
- Warm it slightly: Rub a small amount between your palms to warm before applying for better absorption.
- Combine with massage: Always massage into your scalp using circular motions to boost circulation.
But wait, there’s more. Many people find adding a teaspoon of castor oil or a few drops of rosemary essential oil (diluted properly) to the final bottle enhances the texture.
How to Apply Aloe Vera Oil to Your Hair
Incorporating this oil into your routine is straightforward. Try these methods:
- Pre-wash treatment: Apply to dry hair and scalp, cover with a shower cap, leave on for 30-60 minutes or overnight, then shampoo as usual.
- Scalp massage oil: Use a few drops directly on the scalp between washes for soothing and moisturizing.
- Leave-in conditioner: Mix a tiny amount with your regular conditioner or apply sparingly to ends for shine and frizz control.
Start with small amounts – a little goes a long way since it’s oil-based.
Potential Ways Aloe Vera Supports Hair Appearance
Aloe vera is rich in moisture-retaining compounds. Here’s why it’s loved:
- Helps hair feel softer and more hydrated
- May soothe occasional scalp dryness or discomfort
- Contributes to a shinier look after regular use
- Easy to blend into other natural recipes
Some preliminary research has looked at aloe vera’s role in skin and scalp hydration, though more studies are always welcome. Traditional use spans many cultures for beauty purposes.
Common Mistakes to Avoid When Making Aloe Vera Oil
Even simple recipes have pitfalls. Avoid these:
- Using high heat, which can degrade the beneficial elements
- Not straining thoroughly, leading to watery separation later
- Using old or yellow aloe leaves (stick to fresh, clear gel)
Variations to Try Once You’ve Mastered the Basic Recipe
Once comfortable, experiment safely:
- Coconut vs. Jojoba: Coconut for thicker hair, jojoba for lighter feel.
- Add essential oils: Lavender or tea tree for scent (always dilute).
- Make a bigger batch: Double ingredients but follow same low-heat rules.
Storage Tips and Shelf Life
Your homemade aloe vera oil typically lasts 2-3 months when stored properly. The vitamin E option can extend this. Always check for changes in smell or appearance before use.

Conclusion
Creating your own aloe vera oil is a rewarding way to take charge of your hair care with natural ingredients. With this straightforward guide, you now have everything needed to make a batch that fits perfectly into your routine for softer, more manageable hair.
Give it a try this weekend and see how it feels. Your hair – and your wallet – might just thank you.
FAQ
How long does it take to see results from using aloe vera oil on hair?
Results vary by individual, but many notice softer hair and better moisture after a few consistent uses over 2-4 weeks.
Can I use aloe vera oil if I have colored or chemically treated hair?
Yes, it’s generally gentle, but always do a small test first. It can help restore moisture to processed hair.
Is it safe to make aloe vera oil without any special equipment?
Absolutely. A basic saucepan, knife, and strainer are all you need. No fancy tools required for great results.
Disclaimer: The information in this article is for educational and informational purposes only. It is not a substitute for professional medical or dermatological advice. Consult a qualified healthcare provider before trying any new hair care products, particularly if you have allergies, skin conditions, or other health concerns. Individual results may vary.
