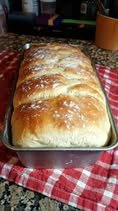
Authentic Sweet Amish Loaves
Oh my goodness, is there anything better than the smell of warm, yeasty bread drifting out of your kitchen? It instantly transports me back to my grandmother’s house—it’s just the ultimate comfort smell, right? For years, I wanted to recreate that experience for my own four kids, and I finally landed on this Amish Sweet Bread recipe that delivers that perfect, soft texture every single time.
This isn’t your fancy artisanal sourdough, bless its heart. This is the simple, honest, slightly sweet sandwich loaf that you want to slice thick and slather with butter and jam. It uses basic pantry staples—I promise you have everything in your kitchen right now! And while it does involve a few rising sessions, the actual hands-on time is short, which is exactly what a busy parent needs.
I know working with yeast can sound a little scary, but I’ve kept the instructions super clear so even if you’re a complete bread-making beginner, you can be successful. This recipe exists because everyone deserves to taste a slice of true homemade happiness, and this Sweet Bread is the easiest way to get there. Get ready to bake two gorgeous loaves and make your whole house smell heavenly!
Why You’ll Love This Recipe
- Tender Texture: Comes out perfectly soft, fluffy, and never dry.
- Simple Ingredients: Relies only on basic, budget-friendly pantry staples.
- Wonderful Aroma: Fills your entire house with that comforting fresh-baked scent.
- Makes Two Loaves: One to eat now and one to freeze or share with a friend!
- Beginner Friendly: A great introduction to working with active dry yeast.
Ingredients You’ll Need
- The essential moistening agent that activates the yeast and brings the dough together.
- The life force that makes the dough rise and contributes to the classic bread flavor.
- The primary structural component that gives the final product its form and chew.
- The necessary seasoning element that controls the yeast activity and enhances the overall flavor of the final bake.
- The liquid fat that keeps the crumb tender and prevents the bread from drying out.
- The crystalized element that feeds the yeast and imparts the signature mild sweetness.
How It’s Made
This process starts by gently warming the moistening agent and combining it with the sweetener to create a happy home for the life force to activate. Once everything is bubbly, you mix in the rest of the wet and dry elements until a slightly sticky mass is formed. After a quick session of working the dough by hand, it takes a long initial rest to double in size. Finally, it’s shaped into two separate containers for a shorter second rest before being baked until golden.
Tips, Variations & Storage
- Tip for Yeast: Ensure your moistening agent is exactly the right temperature before adding the yeast. If it’s too hot, you’ll ruin the life force! It should feel warm, but not hot, to the touch.
- Avoid Over-Flouring: Only add enough of the structural component during kneading to keep the dough from sticking. Too much flour results in a dry, dense loaf—we want soft bread!
- Substitution (Fat): You can easily swap the neutral liquid cooking fat for melted butter for a richer, more buttery flavor profile.
- Add-in Idea: Right after the first long rest, fold in a half-cup of dried raisins or cinnamon chips for a delicious breakfast variation.
- Storing Leftovers (Counter): Once completely cool, wrap the bread tightly in plastic or keep it in a bag on the counter for up to 2-3 days.
- Freezer Notes: Sweet bread freezes beautifully! Wrap the completely cooled loaf in plastic wrap, then aluminum foil, and store it for up to 3 months. Thaw it fully before slicing.
FAQ
Q: My dough didn’t rise during the first rest. What went wrong?

A: The most common culprit is that the activating liquid was too hot and killed the yeast, or the yeast was old. Always ensure the temperature is correct and that your yeast is fresh!
Q: Do I really need two separate resting (rising) times?
A: Yes, the first long rest is crucial for developing flavor and creating internal gasses, while the shorter second rest gives the final shaped loaf its beautiful dome and helps it rise properly in the oven.
Q: What is the best way to tell if the bread is finished baking?
A: The loaves should be a deep, uniform golden-brown on top. If you have an instant-read thermometer, the internal temperature of the bread should reach 200°F to 210°F.

Q: Why does the recipe call for adding the flour gradually?
A: Adding the structural component slowly ensures it is properly incorporated and allows you to adjust the exact amount needed. Too much dry component makes the final bread tough and dry.
Q: How should I store this bread to keep it fresh longer?
A: Store the wrapped bread at room temperature, making sure all the air is squeezed out of the storage bag or container. You can also refrigerate it in an airtight container for up to five days.
Q: What is the best method for kneading the dough?
A: You can use a stand mixer with a dough hook until the dough cleans the sides of the bowl, or you can knead by hand on a lightly floured surface for the recommended five minutes until it feels smooth and elastic.