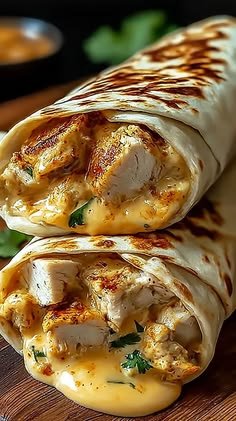
These Cheesy Garlic Chicken Wraps are packed with juicy, seasoned chicken, melted cheese, creamy garlic sauce, and soft tortillas toasted until beautifully golden and crispy. Every bite delivers the perfect combination of cheesy goodness, savory garlic flavor, and tender chicken.
They are easy to prepare, incredibly satisfying, and perfect for lunch, dinner, meal prep, or a quick family-friendly meal.
1. Recipe Overview
| Detail | Information |
|---|---|
| Preparation Time | 15 minutes |
| Cooking Time | 20 minutes |
| Total Time | 35 minutes |
| Servings | 4 wraps |
| Difficulty | Easy |
| Course | Lunch / Dinner |
| Cuisine | American-inspired |
| Cooking Method | Skillet |
2. Ingredients
For the Chicken Filling
2 large boneless, skinless chicken breasts (approximately 500 g)
1 tablespoon olive oil
1 tablespoon butter
3 cloves garlic, minced
1 teaspoon paprika
½ teaspoon garlic powder
½ teaspoon onion powder
½ teaspoon Italian seasoning
½ teaspoon black pepper
¾ teaspoon salt, or to taste
½ teaspoon chili flakes (optional)
1 tablespoon lemon juice
For the Creamy Garlic Sauce
½ cup mayonnaise
¼ cup sour cream
2 cloves garlic, finely minced
1 tablespoon lemon juice
1 teaspoon Dijon mustard
1 tablespoon chopped fresh parsley
¼ teaspoon black pepper
A pinch of salt
For the Wraps
4 large flour tortillas
1 cup shredded mozzarella cheese
½ cup shredded cheddar cheese
½ cup shredded lettuce
1 small tomato, diced
¼ small red onion, thinly sliced
1 tablespoon butter or olive oil for toasting
Optional Additions
Sliced jalapeños
Chopped bell peppers
Cooked bacon pieces
Fresh coriander
Sliced avocado
Extra mozzarella cheese
3. Kitchen Equipment
Large frying pan or skillet
Cutting board
Sharp knife
Mixing bowls
Whisk
Spatula or tongs
Measuring cups and spoons
Cheese grater
Serving plate
4. Step-by-Step Instructions
Step 1: Prepare the Chicken
Place the chicken breasts on a clean cutting board.
Pat them dry with paper towels.
Cut the chicken into small bite-sized cubes or thin strips.
Transfer the chicken to a mixing bowl.
Add paprika, garlic powder, onion powder, Italian seasoning, salt, and black pepper.
Add chili flakes if you prefer a little heat.
Pour in the lemon juice and olive oil.
Toss everything until the chicken is evenly coated.
Let it rest for approximately 5–10 minutes.
Cutting the chicken into small pieces helps it cook quickly and distributes the seasoning throughout the filling.
Step 2: Cook the Garlic Chicken
Heat a large skillet over medium heat.
Add the butter and allow it to melt.
Add the seasoned chicken pieces in a single layer.
Cook for approximately 5–7 minutes, stirring occasionally.
Add the minced garlic.
Continue cooking for another 1–2 minutes.
Stir until the garlic becomes fragrant.
Check the thickest chicken pieces with a meat thermometer.
Ensure the chicken reaches an internal temperature of 165°F (74°C).
Remove the skillet from the heat.
Avoid overcooking the chicken because it can become dry and chewy.
Step 3: Prepare the Creamy Garlic Sauce
Add mayonnaise to a small mixing bowl.
Add sour cream.
Stir in the minced garlic.
Add lemon juice and Dijon mustard.
Add chopped parsley.
Season with black pepper and a little salt.
Whisk until smooth and creamy.
Taste and adjust the seasoning if necessary.
Refrigerate for approximately 10 minutes to allow the flavors to develop.
The sauce should be creamy, slightly tangy, and full of fresh garlic flavor.
Step 4: Prepare the Fresh Vegetables
Wash and dry the lettuce.
Shred it into thin pieces.
Dice the tomato into small cubes.
Thinly slice the red onion.
Prepare any optional vegetables you want to include.
Set everything aside.
If the tomato is particularly juicy, remove some of its seeds to prevent soggy wraps.
Step 5: Prepare the Tortillas
Place the tortillas on a clean work surface.
Warm each tortilla in a dry skillet for approximately 10–15 seconds per side.
Remove them once they become soft and flexible.
Place them on a plate.
Spread a thin layer of creamy garlic sauce over the center of each tortilla.
Do not overheat the tortillas because they may become stiff and difficult to fold.
Step 6: Assemble the Chicken Wraps
For each tortilla:
Add a generous portion of cooked garlic chicken down the center.
Sprinkle mozzarella cheese over the chicken.
Add shredded cheddar cheese.
Add shredded lettuce.
Spoon over some diced tomatoes.
Add thinly sliced red onion.
Drizzle with additional creamy garlic sauce.
Add jalapeños or other optional toppings if desired.
Keep the filling in the center and avoid overfilling the tortilla.
Step 7: Fold the Wraps
Fold the left and right sides of the tortilla toward the center.
Fold the bottom edge upward over the filling.
Roll the tortilla tightly toward the opposite edge.
Keep the filling tucked inside as you roll.
Place the wrap seam-side down.
A tight fold helps prevent the filling from falling out during toasting.
Step 8: Toast Until Golden and Cheesy
Heat a clean skillet over medium-low heat.
Add a little butter or olive oil.
Place the assembled wraps seam-side down.
Cook for approximately 2–3 minutes.
Gently turn each wrap over.
Cook the other side until golden brown.
Continue heating until the cheese inside is melted.
Remove from the skillet.
Allow the wraps to rest for 1–2 minutes.
Slice diagonally and serve warm.
The outside should be golden and slightly crispy, while the inside should be hot, creamy, and cheesy.
5. Taste and Texture
These wraps have a delicious combination of flavors and textures:
Chicken: Juicy, tender, and seasoned with garlic and herbs.
Cheese: Melted mozzarella provides stretchiness, while cheddar adds a rich flavor.
Garlic sauce: Creamy, tangy, and packed with fresh garlic.
Vegetables: Lettuce, tomato, and onion add freshness and crunch.
Tortilla: Soft inside with a lightly crispy, golden exterior.
6. Important Tips for Perfect Wraps
Cut chicken into evenly sized pieces for consistent cooking.
Use fresh garlic for the strongest flavor.
Do not overcrowd the skillet when cooking chicken.
Use freshly shredded cheese for better melting.
Avoid adding too much sauce inside the wraps.
Remove excess moisture from lettuce and tomatoes.
Warm tortillas before filling to prevent cracking.
Do not overfill the wraps.
Toast over medium-low heat to melt the cheese without burning the tortillas.
Allow the wraps to rest briefly before slicing.
7. Delicious Variations
Spicy Cheesy Garlic Chicken Wraps
Add chili flakes, hot sauce, and sliced jalapeños to the chicken filling.
BBQ Chicken Wraps
Replace some of the garlic sauce with barbecue sauce and add smoked cheddar.
Bacon Cheesy Chicken Wraps
Add crispy cooked bacon pieces for a smoky, savory flavor.
Mediterranean Chicken Wraps
Add cucumber, red onion, tomatoes, feta cheese, and a little oregano.
Ranch Chicken Wraps
Replace the creamy garlic sauce with ranch dressing and add extra cheddar.
Low-Carb Chicken Wraps
Use low-carb tortillas and increase the chicken and vegetable filling. Choose a lower-sugar sauce if desired.
Extra Cheesy Chicken Wraps
Add an additional ½ cup mozzarella and ¼ cup cheddar for an extra-rich filling.
8. What to Serve with Cheesy Garlic Chicken Wraps
These wraps pair beautifully with:
Crispy French fries
Sweet potato fries
Coleslaw
Garlic potato wedges
Fresh cucumber salad
Tomato and onion salad
Roasted vegetables
Corn on the cob
Creamy tomato soup
Pickles and jalapeños
Best combination: Serve with crispy potato wedges, a small bowl of extra garlic sauce, and a fresh cucumber salad.
9. Storage and Meal Prep
Refrigerator:
Store cooked chicken separately from fresh vegetables and tortillas whenever possible.
Keep the garlic sauce in a separate airtight container.
Refrigerate cooked chicken within 2 hours.
Use refrigerated cooked chicken within 3–4 days.
Store prepared garlic sauce for up to 3–4 days if made with fresh ingredients and kept refrigerated.
Meal Prep:
Cook the seasoned chicken in advance.
Allow it to cool.
Divide it into individual portions.
Store the chicken in airtight containers.
Prepare the sauce separately.
Assemble the wraps shortly before serving for the best texture.
Reheating:
Reheat the chicken in a skillet or microwave until hot.
Assemble the wrap with fresh vegetables and sauce.
Toast in a skillet until golden.
Avoid reheating lettuce and fresh tomato inside the wrap.
Freezing:
Cooked seasoned chicken can be frozen separately for up to 2–3 months for best quality. Avoid freezing fully assembled wraps containing lettuce, tomatoes, and creamy sauce because their texture can deteriorate.
10. Approximate Nutrition Information
Estimated per wrap, assuming four servings and the listed ingredients. Actual values depend on tortilla size, cheese, and sauce quantities.
| Nutrient | Approximate Amount |
|---|---|
| Calories | 650 kcal |
| Protein | 43 g |
| Carbohydrates | 43 g |
| Fat | 34 g |
| Saturated Fat | 12 g |
| Fiber | 3 g |
| Sugar | 4 g |
| Sodium | 950 mg |
11. Frequently Asked Questions
Q1: Can I use rotisserie chicken instead of fresh chicken breasts?
Yes. Shred approximately 3 cups of cooked rotisserie chicken. Warm it in a skillet with butter, garlic, and the seasonings before assembling the wraps.
Q2: Which cheese works best for these wraps?
Mozzarella and cheddar are an excellent combination. Mozzarella gives a stretchy texture, while cheddar adds a stronger cheesy flavor.
Q3: Can I make these wraps without mayonnaise?
Yes. Replace the mayonnaise with additional Greek yogurt or sour cream. The sauce will taste lighter and slightly tangier.
Q4: How do I stop the wraps from becoming soggy?
Use well-drained vegetables, avoid adding excessive sauce, and assemble shortly before serving. Keep wet ingredients away from the tortilla until you’re ready to eat.
Q5: Can I make these wraps in an air fryer?
Yes. Brush the outside lightly with oil and air-fry at 375°F (190°C) for approximately 5–8 minutes, turning halfway through. Cooking time varies depending on the air fryer and tortilla size.
Q6: Can I prepare the chicken the night before?
Absolutely. Cook the chicken, cool it, and refrigerate it in an airtight container. Reheat it thoroughly before assembling the wraps.
Q7: Can I use corn tortillas?
Large flour tortillas are easier to fold and hold the filling better. Corn tortillas are generally smaller and more likely to crack, so they are not the best choice for this recipe.
Q8: How can I make the wraps extra crispy?
Use a lightly buttered skillet, avoid overfilling, and toast each side over medium-low heat until golden brown.
12. Troubleshooting Guide
| Problem | Possible Cause | Solution |
|---|---|---|
| Chicken is dry | Overcooking | Check temperature and remove at 165°F |
| Tortillas crack | Tortillas are too cold | Warm briefly before filling |
| Wraps fall apart | Too much filling | Reduce filling and fold tightly |
| Cheese does not melt | Heat is too high or cooking time is short | Toast over medium-low heat with a lid |
| Sauce tastes too strong | Too much raw garlic | Reduce garlic or add more sour cream |
| Wraps become soggy | Excess moisture from vegetables | Drain vegetables and use less sauce |
| Tortillas burn | Skillet is too hot | Reduce heat and turn frequently |
13. Health and Nutrition Benefits
Chicken provides high-quality protein.
Cheese contributes protein and calcium.
Lettuce and tomatoes provide vitamins and additional nutrients.
Garlic adds flavor without needing excessive seasoning.
Fresh vegetables add texture and fiber.
Homemade sauce allows you to control ingredients and salt.
For a lighter version, use whole-wheat tortillas, lean chicken breast, reduced-fat cheese, and Greek yogurt instead of mayonnaise.
14. Chef’s Special Tips
Marinate the chicken for 30 minutes if you have extra time.
Add garlic toward the end of cooking to prevent burning.
Use a mixture of mozzarella and cheddar for the best cheesy texture.
Add a little lemon zest to the garlic sauce for freshness.
Let the chicken rest briefly before assembling.
Press the wraps gently with a spatula while toasting for a restaurant-style crispy finish.
Serve with extra garlic sauce on the side.
15. Why You’ll Love This Recipe
Ready in approximately 35 minutes.
Packed with juicy garlic chicken.
Loaded with melted cheese.
Easy homemade creamy garlic sauce.
Crispy golden tortilla exterior.
Perfect for lunch, dinner, or meal prep.
Easy to customize with your favorite vegetables and toppings.
Family-friendly and satisfying.
16. Final Thoughts
These Cheesy Garlic Chicken Wraps are the perfect combination of juicy chicken, creamy garlic sauce, melted cheese, and fresh vegetables wrapped in a golden, crispy tortilla.
They’re simple to prepare, full of flavor, and ideal for busy days when you want something delicious without spending hours in the kitchen.